Introduction
If you’ve begun your journey into the world of dry herb concentrates, you may have come across the term ‘Nectar Collector’ or ‘Honey straw.’ You might have taken your first ever dab with one of these beauties. Not everyone has heard of nectar collectors; others may have heard the term but never looked any further into it. If that includes you then you’ve come to the right place.
In this article, we’re going to explore everything you need to know about nectar collectors. We’ll touch on their history, explaining how they were invented and why they became popular. You’ll learn how to use them effectively, the benefits they offer, and tips for maintaining your device to ensure a great dabbing experience. Whether you’re a beginner or looking to enhance your knowledge, this guide will cover all aspects of nectar collectors, setting you on the path to becoming a dabbing pro
What is a Nectar Collector?

Simply put, nectar collectors are portable devices used for consuming dry herb concentrates. They resemble a straw and are used in an almost identical way, this is why they’re also sometimes called a “honey straw”.
These handy tools have gained popularity due to their simplicity, ease of use, and efficiency. A typical nectar collector consists of three main parts: a mouthpiece, a body, and a tip, usually made of glass, quartz, or titanium.
As with so many other things, nectar collectors started out with very simple designs. The basic nectar collectors are still around, but now you can now find extravagantly designed glass pieces in all kinds of colours and shapes.
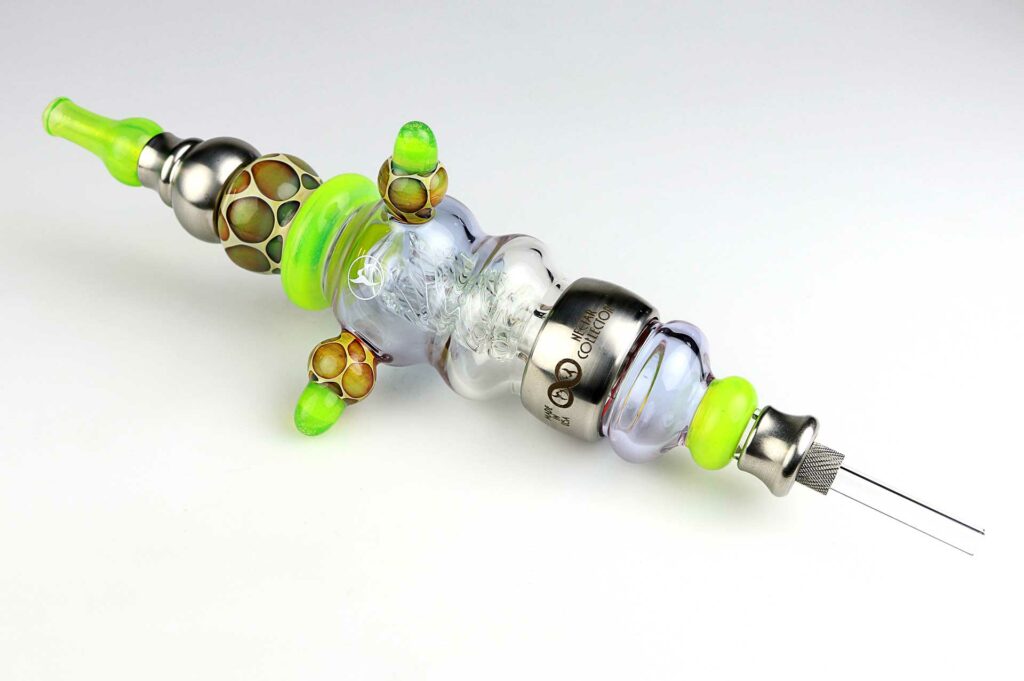
In most cases, the anatomy of a nectar collector is straightforward enough:
The mouthpiece is where you inhale the vapour, ensuring a direct and smooth draw.
The body, which often features a percolator for added filtration, provides a comfortable grip and stability.
The tip which is heated before use, is designed to vaporise the concentrate upon contact.
This simplistic design not only makes nectar collectors easy to use but also very portable, allowing for convenient dabbing on the go. Additionally, their efficient design means you can enjoy your concentrates with minimal waste, making them a favourite among both novice and experienced users.
The History of Nectar Collectors
The Inventor, Kristian Merwin
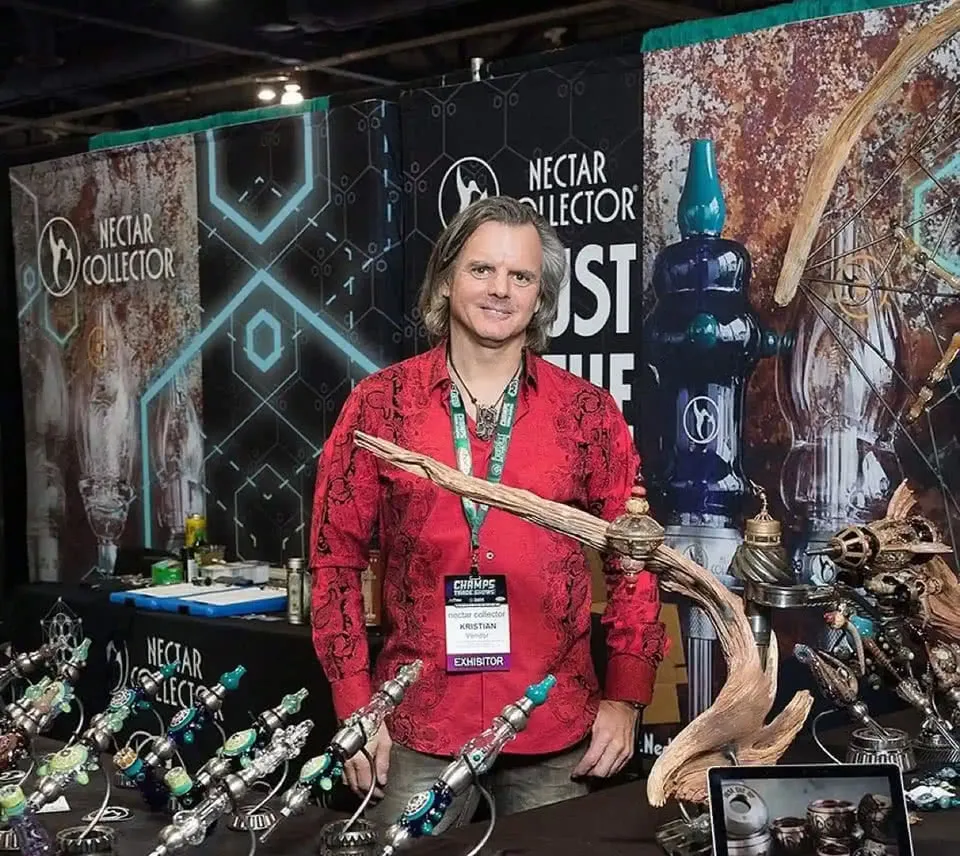
Nectar collectors were invented in 2011 by a glass artist named Kristian Merwin (you should check out his instagram, he’s insanely talented). Hailing from Salt Lake City, Utah, Kristian is a former professional rock climber. Merwin’s Nectar Collector design takes inspiration from the original dabbers, bees and hummingbirds. He set out to create a similar process of easy, simple smoking of waxes and dry herb oils through the use of his Nectar Collector.
Merwin’s work is profoundly influenced by the mountains and deserts that surround his home base. His artfully crafted glass products combine organic shapes and colours to signify the tenacity and will that are needed to survive in those high and dry places that define his surroundings.
(source sevensense.org)
Good Timing
The invention of the nectar collector coincided nicely with the rise in popularity of dry herb concentrates. As concentrates became more popular, the need for a portable, efficient, and user-friendly device to consume them became apparent.

Traditional dab rigs were often cumbersome and not ideal for on-the-go use, leading to the creation of the nectar collector. Its design allows users to enjoy their concentrates without the need for a bulky setup, making dabbing more accessible and convenient.
The fact that the nectar collector was able to give the user an experience as simple as taking a sip of their favourite beverage from a straw, was an instant hit.
How to Use a Nectar Collector
Using a nectar collector is a very straightforward procedure. Even though it’s easy, there are still a few things you need to be aware of. Experimentation with your nectar collector is going to help you to refine your skills and you’ll be a honey straw master in no time.
Here are some basic instructions to get you started:
- Preparation: Gather your concentrates and place them on a heat-resistant surface. Many people use a little dish made of silicone or glass. Over at chill kiwi we have an awesome wee honey straw set that comes with a glass dish, perfect for this step!
Make sure your nectar collector is clean and assembled correctly. - Heating the Tip: Using a torch lighter, heat the tip of the nectar collector until it glows. Allow it to cool slightly to prevent burning the concentrate. A good rule of thumb is when the tip only just stops glowing. This is one of the few drawbacks of nectar collectors, the temperature control can be hard to manage at first.
- Dabbing: Once the tip has cooled for a few seconds, gently press it against the concentrate while inhaling through the mouthpiece. The heat will vaporise the concentrate, producing a smooth, flavourful vapour. The keyword here is gently. You want to approach the concentrate slowly with the tip. Going in too quickly can give you a sub-optimal experience.
- Cooling and Storage: Allow the tip to cool completely before storing the nectar collector. We recommend placing the nectar collector on a cloth to catch any dripping that might occur during cool down.
Clean the device regularly to maintain optimal performance.
Benefits of Using a Nectar Collector
- Portability: Nectar collectors are compact and easy to transport, making them ideal for on-the-go use. You’ll want to make sure you’ve got a safe and secure container or bag for transporting, glass isn’t always happy about being dropped.
- Efficiency: They allow for precise dabbing, ensuring minimal waste of concentrates. They also don’t require lengthy set up times. It’s really heat and go type stuff.
- Ease of Use: Simple to operate, nectar collectors are perfect for both beginners and experienced users. Beginners to the dabbing world can quickly become overwhelmed with the amount of gear that’s out there. The nectar collector solves this in a big way. Honey straw, torch lighter, simple. And for the experienced dabber they’re great for a nice lazy dab. Nothing fancy, just good straight concentrate goodness without the fuss.
- Customisation: Available in various materials and designs, users can choose a nectar collector that suits their preferences and needs.
- Sharing is Caring: Nectar collectors are one the very best ways to have a shared concentrates session. The nectar collector is so simple to just pass around and use quickly. So they’re great for the solo or the social sessionist.
Why Nectar Collectors Are Great
Nectar collectors were created to meet the demand for a more portable and efficient way to consume dry herb concentrates. Traditional dab rigs, while effective, were often large and required multiple components, making them impractical for travel or discreet use. Nectar collectors offer a streamlined, easy-to-use alternative that can be used virtually anywhere, providing a solution for concentrate enthusiasts who need a more convenient option.
Tips for Getting the Most Out of Your Nectar Collector
- Use High-Quality Concentrates: The quality of the concentrate greatly affects the overall experience. Opt for high-quality, clean concentrates to enjoy the best flavours and effects. You can also add some really nice enhancers to your concentrates if it’s not tip top quality stuff already. And even if it is, some terpene additives can be a great flavour enhancer to boost your experience!
- Control the Temperature: Avoid overheating the tip, as it can burn the concentrate and produce harsh vapour. Experiment with different cooling times to find the optimal temperature for smooth hits.
- Regular Cleaning: Keep your nectar collector clean to ensure consistent performance and pure flavour. Use isopropyl alcohol and warm water for effective cleaning. Once the tip has cooled down fully, you can try submerging it in isopropyl alcohol for at least an hour. This should completely eradicate any gunk left over, after a quick wipe with a cotton bud.
- Invest in a Good Torch: A reliable torch lighter is essential for heating the tip efficiently. Ensure it is easy to handle and produces a consistent flame.
Maintenance Tips for Your Nectar Collector
- Frequent Cleaning: Clean your nectar collector after each use to prevent residue build-up. A clean device ensures better flavour and smoother hits.
- Use Isopropyl Alcohol: Soak the components in isopropyl alcohol to dissolve any stubborn residues. Rinse thoroughly with warm water before use.
- Inspect for Damage: Regularly check for any cracks or damage, especially on the tip. Replace damaged parts promptly to maintain optimal performance and safety.
- Proper Storage: Store your nectar collector in a padded case to protect it from damage. Ensure the tip is cooled completely before storing.
Conclusion
Nectar collectors are an excellent option for those looking to enjoy dry herb concentrates conveniently and efficiently. With their portability, ease of use, and customisation options, they offer a unique and enjoyable dabbing experience. By following the tips provided and understanding the history and purpose of nectar collectors, you can ensure you get the most out of your device. Check out our range here!